

 Please note this page is not about Chimera Productions LARP Games. Please see the links above to navigate to Chimera LARP information.
This page is written by a Chimera Productions Organiser about her own costuming experience.

In May 2014, specifically May the fourth, a local cinema ran a Star Wars celebration screening all six films. I did not attend in costume, but a few people did. They were good – but I thought, I’m a roleplayer, I should be in costume too, and I can do better than this! So for some reason I decided that I wanted to make a Wookiee costume. The true challenge among Star Wars costumes, I thought. Or at least the challenge that I could manage – Vader costumes still seem out of my league.
I am a regular LARPer, and run my own LARP group in fantasy settings (hence the host site for this blog). In September (or was it October?) 2014, a friend announced the intention to run a Star Wars based LARP. Even thought this is most likely a once only event. I decided finally that it was time to start the Wookiee outfit.
The intention was to create a Wookiee costume suitable for LARPing, not to replicate any existing character. This page is intended to summarise my experience.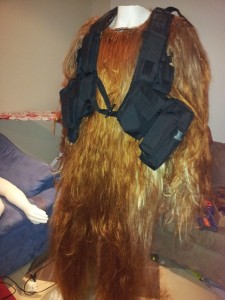
One of the most important things to note is my location – Melbourne, Australia – and my experience level with costuming. I am not a cosplayer. I do not have extensive experience in costuming. I do however have over ten years of experience as a LARPer. I design and make LARP props and costumes to a certain extent. However my skills are more in management and writing than the creative part of LARPing. For this I have my sister – who taught herself to sew and make clothing specifically for LARP costuming; and one of our best friends Luke who has recently completed a special effects makeup training course and taught himself methods to make latex LARP weaponry and other props. In other words two very creative people to support me. And of course my husband, who is willing to let me spend an infinite amount of money and time on this crazy project. I would not have considered commencing this project without these people.
So this page will contain various components of the costume building process under different headings. It is not necessarily chronological. See the timeline section for the most recent date of update and progress. I will just add and change notes in all the other sections as I progress.
Research
I have scoured the web for builders resources, and also pictures to inspire the look for the Wookiee. Below are all the links and sites that I have remembered to record. Probably not everything I referred to, but lots anyway.
Construction and reference links:
- http://gotwookiee.com/ – This is THE site for wookiee costume resources.
- Rebel Legion forums
- the RPF forum
- https://wookiecostuming.wordpress.com/
Hair links:
- kickshins.com,
- doctoredlocks.com,
- bnghair.com
- But I didn’t end up buying from any of these, I purchased locally from a wig / African hair braiding shop. Thanks Abbey’s for the hair!
Electronics links:
- Electronics123.com
- Jaycar electronics store
- Ebay for sundry connectors and wires
Sound links:
- Soundboard (free to join, 20 Wookiee sounds)
- Goldwave wav converter www.goldwave.com/release.php
- Star Wars The Old Republic – I have recorded a number of sounds from the characters Bowdarr and Jakarro
Sewing and sundry tools:
- Lincraft and Spotlight (Australian craft chain stores) – glue and other tools
- Ebay – felting needles
- Lefflers leather in Melbourne – suede and Chicago screws
Teeth and claws
- Plastimake – http://www.plastimake.com/
Costs of the Costume
In case anyone is wondering how much it takes to make a wookiee costume, here is a running summary of what I have spent. Remember that I am in Australia, so this is all in AUD (at the time the exchange rate is about 1 AUD = USD 0.75) and thus I have to ship some items from overseas, shipping costs also included in the costs listed. Also remember that I am the kind of person to splurge with money and I often don’t look for the best price, or hesitate to buy something I need. Which means I may have spent a lot more than other builders.
- Sample hair – about $150, didn’t end up using much of this at all except two latch hook tools
- Mesh fabric for suit – free, I already had a roll
- Electronics – $350 – about $150 for special boards and kits, about $200 for additional materials (including all new soldering kit, speakers, wire, connectors, enclosures, tools, etc.)
- Bulk purchase of Hair – $350, plus additional hair over $50. Probably about $450 total.
- Sewing of suit – free, but a lot of time and effort from a friend
- Suspenders – about $20 from ebay – update – times this by 4, I ended up needing two pairs, and bought extra.
- Sundry hairbrushes, tools and hair ties – about $30 and climbing
- Felting needles – $40 – because I broke my first ones, I ordered a lot.
- Glue – $100, or about 12 bottles 600 ml, plus LOTS of hot glue I already had in the house
- Camp stove and gas cans – free for me
- Stilts – $200 for Giraffe Medium plastering stilts.
- Silicone – $500 BUT I bought a whole gallon, intended for future use too. Ultimately may be a lot less.
- Mask underskull – Worbla board – ~ $120
- Casting materials (plaster bandage and alginate and Chux wipes) – $150
- Moulding clay – water and oil based clays as plasticine – free, borrowed from a friend
- Mask extras – hinges and supports and springs – $30
- Sculpting tools, leather rivets, riveting tools – borrowed from friend for free
- Various thicknesses craft foam, elastic, Velcro (hook and loop) tape – all things I already had around the house from other LARP projects
- Gloves – $2 white cotton gloves, $2 mesh over-glove thing
- Suede for skin – $40 from a leather warehouse
- Fibreglass kit x 2- $65
- Sundry tools used in casting and mask making – $30
- Conditioner and hold sprays for synthetic hair – about 6 bottles for about $50
- Belt mounted speakers – $50 each, bought 3 from P&L in New York. (One to use, a spare and another spare…)
Hmmm – at June 2015 this is over ~A$2000! More than I had anticipated, but oh well. I am lucky enough to afford this insane hobby. Remember, I tend to spend first and think later.
Update – at Jan 2016, after the movie premiere. I have spent so much more in the last few months getting it ready, I really have lost count now. Could easily be $2500 or more. Sorry if you are trying to make a budget, I just totally lost track now, especially on my electronics expenses.
Update – at Dec 2017, I have made a lot more modifications, especially to the electronics. I have spent a couple of hundred on updated elctronics boards as new ones became available and Windows 10 made my old ones obsolete. I also have bought several pairs of moccasins, gloves, suede and hairbrushes. I no longer have any track of how much the suit has cost, but my estimate is in excess $3000.
Time and timeline
The decision was made to commence about middle of October 2014. I made a purchase of sample hair and purchase of electronics at this time, and thus I was committed.
October 2014
- Oct 21ish – Electronics and sample hair ordered (from USA)
- October 27 – 20 Wookiee voice samples downloaded and mixed using Soundforge (free demo!)
- October 28 – hair samples arrive, I choose my colour palette
- October 30 – purchasing hair from local supplier
November 2014
- Trial mesh suit. Stuffed it up – see below. Had to ask friend to remake the suit entirely. Thus the timeline became dependent on this friend.
- Created sound mixes. Loaded onto electronics. Then killed a board due to overload from VOX relay. Require new board.
December 2014
- Due to a number of issues work was delayed and I made no progress in December
January 2015
- Mesh suit finally arrived from a friend. Commenced work outlining hair colouring patches, then started latch hooking.
- Latchhooking about 2 to 3 hours a night, 3 or 4 nights a week.
- Ordered and received stilts from plastering supplier.
- Silicone for mask chosen and ordered in late January.
February 2015
- At beginning of Feb, latch hooking about 20% done.
- Latchhooking practically every night throughout Feb
March 2015
- Latchhooking maybe every other night through March
- Mid March, latch hooking about 80% done
- Preliminary work for mask underskull conducted (by my SFX friend, not me!)
April 2015
- By the beginning of April the suit is finished in overall looks, but there is still a lot of work thickening up certain patches.
- April 13 – suit is finished, all thickened up on the arms and front as necessary. Still needs trimming
- Trial modelling of teeth – probably not the final versions, good start
- Obtained two sets of white cotton gloves, still need to work out what design for hands.
- Purchased gardening gloves
- Purchased electronics and working on electronics
- Moulded underskull onto bust
- Working on underskull jaw hinge
May 2015
- Thickened hair on arms of suit
- Completed underskull
- Trial run of electronics, designing links between hands and speakers
- Capture and modify sounds for use
- Thickened hair on back of suit
- Made feet – without hair
- Made gloves – without electronics
June 2015
- Casting the underskull to make clay model for skin
- Thickening hair on all over suit
- Casting teeth from plastimake
- Complete feet hair
- Complete gloves with electronics
July 2015
Madly try to complete the costume. It had to be ready to go overseas before the end of the month.
- Fibreglass the negative for the face
- Pour silicone face
- Separate face from mould – really hard!
- Paint face
- Decide I am unhappy with face and pour again – then decide to use the first anyway
- Sew and latch-hook hood and gorget
- Fix silicone to skull
- Remake underskull as I broke it
- Fix fastenings to support mask
- Weight mask
- Madly punch hair into mask
- Style mask and hood hair
- Complete electronics
- Get vest
August 2015
- Premiere suit at GenCon 2015. Without stilts.
- Travel in USA, no work done.
- Acquired belt mount speakers in New York (couldn’t get them in Australia)
September 2015, October 2015, November 2015
- Work on electronics
- Design mesh for stilts
- Stiltwalking practice
- Latch hook stilts
December 2015
- Complete stilt section
- Match feet to stilts
- Make staff
- Premiere of The Force Awakens, Episode VII – attend midnight session in costume!
- Decide suit needs a lot more work…
January 2016
Update this blog for the first time since June…
So far I estimate I have spent between 10 and 15 hours a week, every week for nearly 6 months and more. Probably 300 – 400 hours work on the suit. And I am still not happy with it!
Throughout 2016
Minor updates and changes now and then. Usually just before use.
The suit sees two outings for Dec 2016 release of Rouge One.
Throughout 2017
Little to no work for most of year, until Nov 2017.
Sees one outing in August 2017 for Star Wars 40th anniversary dinner.
Nov 2017 – Updates to feet – major overhaul of feet. Gloves – attempted an upgrade but as yet unfinished by Dec 2017.
Replaced staff with complete Vibro-axe style, multipart staff.
Replaced all the velcro in suit with alternative clasps.
Preparations for two outings of suit in Dec 2017 for release of The Last Jedi.
CONSTRUCTION NOTES
Mask and head
This part has had some essential preliminary work done before I even conceived of the Wookiee – thank goodness. I have a moulded bust of my head prepared for a SFX makeup course my good friend did a year ago. So I have already sat under the algenate, etc. He owns the plaster bust of me now. And since he is helping with the mask – scratch that, he will probably end up doing all the hard work for the mask for me. Wonderful to have friends, isn’t it?
Anyway, using the plaster bust of me, and an old pair of glasses – see below – my SFX friend has commenced making the underskull from heat mouldable plastic called Worbla. The upper part of the underskull has been created – though this may not be the final version.
Teeth and mouth
I have been thinking a lot about how to make teeth and claws for the Wookiee. In late Feb my SFX friend discovered a website for Plastimake – if you do any costuming or modelling, you have to see this stuff! It will be perfect for making my teeth and claws and maybe even tongue if I decide to do that.
When the sample product arrived I was very excited. I have not yet made the claws or teeth properly, but a few preliminary experiments proved this would be very easy to do. I made a couple of acceptable claws in just a few minutes playing around. The quantity of this Plastimake product offered in the sample kit should be sufficient for both teeth and claws with some to spare.
I have moulded some trial teeth from Plastimake, casting each tooth from either my own teeth and a fake jaw of a lioness I happen to have in the house. The lion’s fangs are not too big, I think they will be ok, but I will not be sure until the skull is finished. The teeth are coloured pale yellow, because white was too stark.
Eventually I made teeth and fangs and gums freehand. I made pink gums using just one colour bead in several teaspoons of Plastimake, this colour stuff is strong. The gums I made initially were thick – about the size I would have guessed for a set of false teeth. Turned out this was too big, and I had a hard time removing plastimake from the gums after I had added the teeth. Recommend next time start with thin layer of pink gum, just enough to attach teeth to, and then add pink gum to this. It is far easier to add then take away.
The teeth I have modeled freehand, so these look terrible! For now they will do, as I feel I am running out of time. (late June 2015). Eventually I plan to replace the teeth with a purchased set. Plastimake makes it easy to add and possible if not easy to remove parts as I can just heat it to reshape.
The teeth needed to fit inside the sculpted silicone skin, over the underskull. I really did this in the wrong order – I made the plasticine sculpt of the face before I made the teeth. Really the teeth should have been part of the underskull. Instead I have had to add these later. Oh well, I seem to do everything the hard way!
The teeth make the mask and jaw a lot heavier – see other sections below. I probably need to add another two springs to ensure the jaw closes properly. However, I am waiting to see if the elasticity of the silicone skin fixes this problem first.
The mask made for the premiere of the movie ended up with a fixed jaw. The silicone was WAY too thick to be flexible. So the moulded teeth, which look OK from a distance, are never actually seen. The silicone of the mouth sits too far forward of the teeth anyway. The only way a jaw will work is with a total redesign of the mask. Which I am planning, as of Dec 2015.
Vision
I am shortsighted – my glasses are, as the Phantom of the Opera says, “my first unfeeling piece of clothing”. I hate contacts. I cannot wear them for long periods, and this costume was intended as an all day thing. So the costume had to include glasses.
Solution – put old glasses lenses into the costume. Initially I decided to make goggles or a visor part of the costume, which would contain my glasses. Not an ideal solution, but a practical compromise. My husband pointed out that even a Wookiee could be short-sighted and wear glasses.
Then my SFX guru Luke said that he could build the lenses into the underskull of the Wookiee itself. Problem solved! I promptly booked an optometrist appointment to update my glasses. I will hand over my older and scratched lenses to Luke when the time comes to build the skull. Turns out I am overdue for a new pair anyway, so I have not added the cost to the list. But if you go this way, you might need to add the cost for new glasses to the shopping bill…
Glasses in the mask make me able to see, but have been a lot of trouble as well. Due to the closeness of the mask and the weight, I have multiple times damaged the glasses frames. Also they get terribly fogged up. Finally, vision is extremely limited from the suit even with the glasses.
The first and second times the suit was worn, I relied on a guide, literally walking with my hand on her shoulder to guide me due to low vision from the suit. This will be a serious problem for use of the suit for LARP, but it acceptable for its current status as a costume for the movie premiere.
Underskull
The underskull is molded of Worbla board – heat moldable plastic material. Its ugly, but it is easier or at least safer to work with than fibreglass. It is heated using a heatgun at 270 degrees Celcius, so it has risks of its own (burns) – but its much cleaner than fibreglass too, practically no mess so I can work at the dining room table.
As noted above, my friend Luke started the work and made the upper skull around my old glasses. I then continued with the nose and lower jaw work. The best thing about the Worbla is that it is remoulable – just heat it again and add strips or reshape at will. Its relatively easy to cut too – although I have blunted at least one pair of scissors working on it so far. The skull is actually made of offcuts of Worbla left over from an earlier project of Luke’s. That is why the skull is made up of several pieces of material overlayed and not ideal size. But this is relatively easy to order and I should really pay him back for this, so I have added the whole cost to the project tally above.
The jaw hinge is simply a strip of aluminium with holes riveted to the jaw and skull, with Chicago screws to make the pivot point. The Chicago screws I got from a local leatherworking warehouse, but they are far too long for the narrow mechanism. I have simply packed out the mechanism with 6 washers to make it smooth and prevent rattle. The Chicago screws have the drawback of being easy to unscrew and might come loose. When the whole mask is complete and I am happy with it I will use locktight or some other glue to permanently secure these as the hinge.
Update – Yep, Chicago screws both worked and came loose easily. I lost a screw the very first time the complete mask was worn (in the USA, no hope of finding it…). Locktight would have been a good idea…
The jaw is held closed with a couple of small springs riveted in place. The jaw is tight enough to pull closed easily, but when wearing it I don’t notice any resistance from the springs.
The back of the mask includes a strip of elastic pulled tighter than natural, to ensure the whole thing grips my head. The mask will be very front heavy and a good tight fit will be needed to counter this. Having an anchor point at the back of the head in the solid skull material will be crucial to this balance, so Luke planned that in from the start. I may have to add more elastic or another heavier grip such as a welders mask band to improve this in the long run.
Inside the skull is placed strips of thing craft foam for comfort. These are placed at support points and anywhere I feel strong contact between skin and mask. However the mask seems quite comfortable without these, but Luke assures me these will be better in the long run when it is heavier. I attached the craft foam using hot glue – for which I paid the price with a nasty burn on my thumb. The trials of the costumer.
Although I have gone ahead and put the craft foam strips inside, I am still working on the finer details of the skull. The jaw for example – I have not decided how to mount the teeth yet, whether these go in the jaw or just in the silicone skin. But the Worbla will allow me to add and take away fairly easily. I have done a fair bit of reheating and reshaping throughout the process – this is the greatest advantage of Worbla over fibreglass or another underskull. But I am sure it will have its drawbacks too.
The next step will be to cast a mould of the Worbla underskull and make a plaster bust of this. The build the wookiee face on this new bust, then cast that again for the silicone skin final piece.
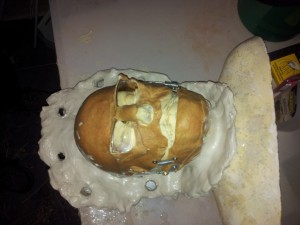
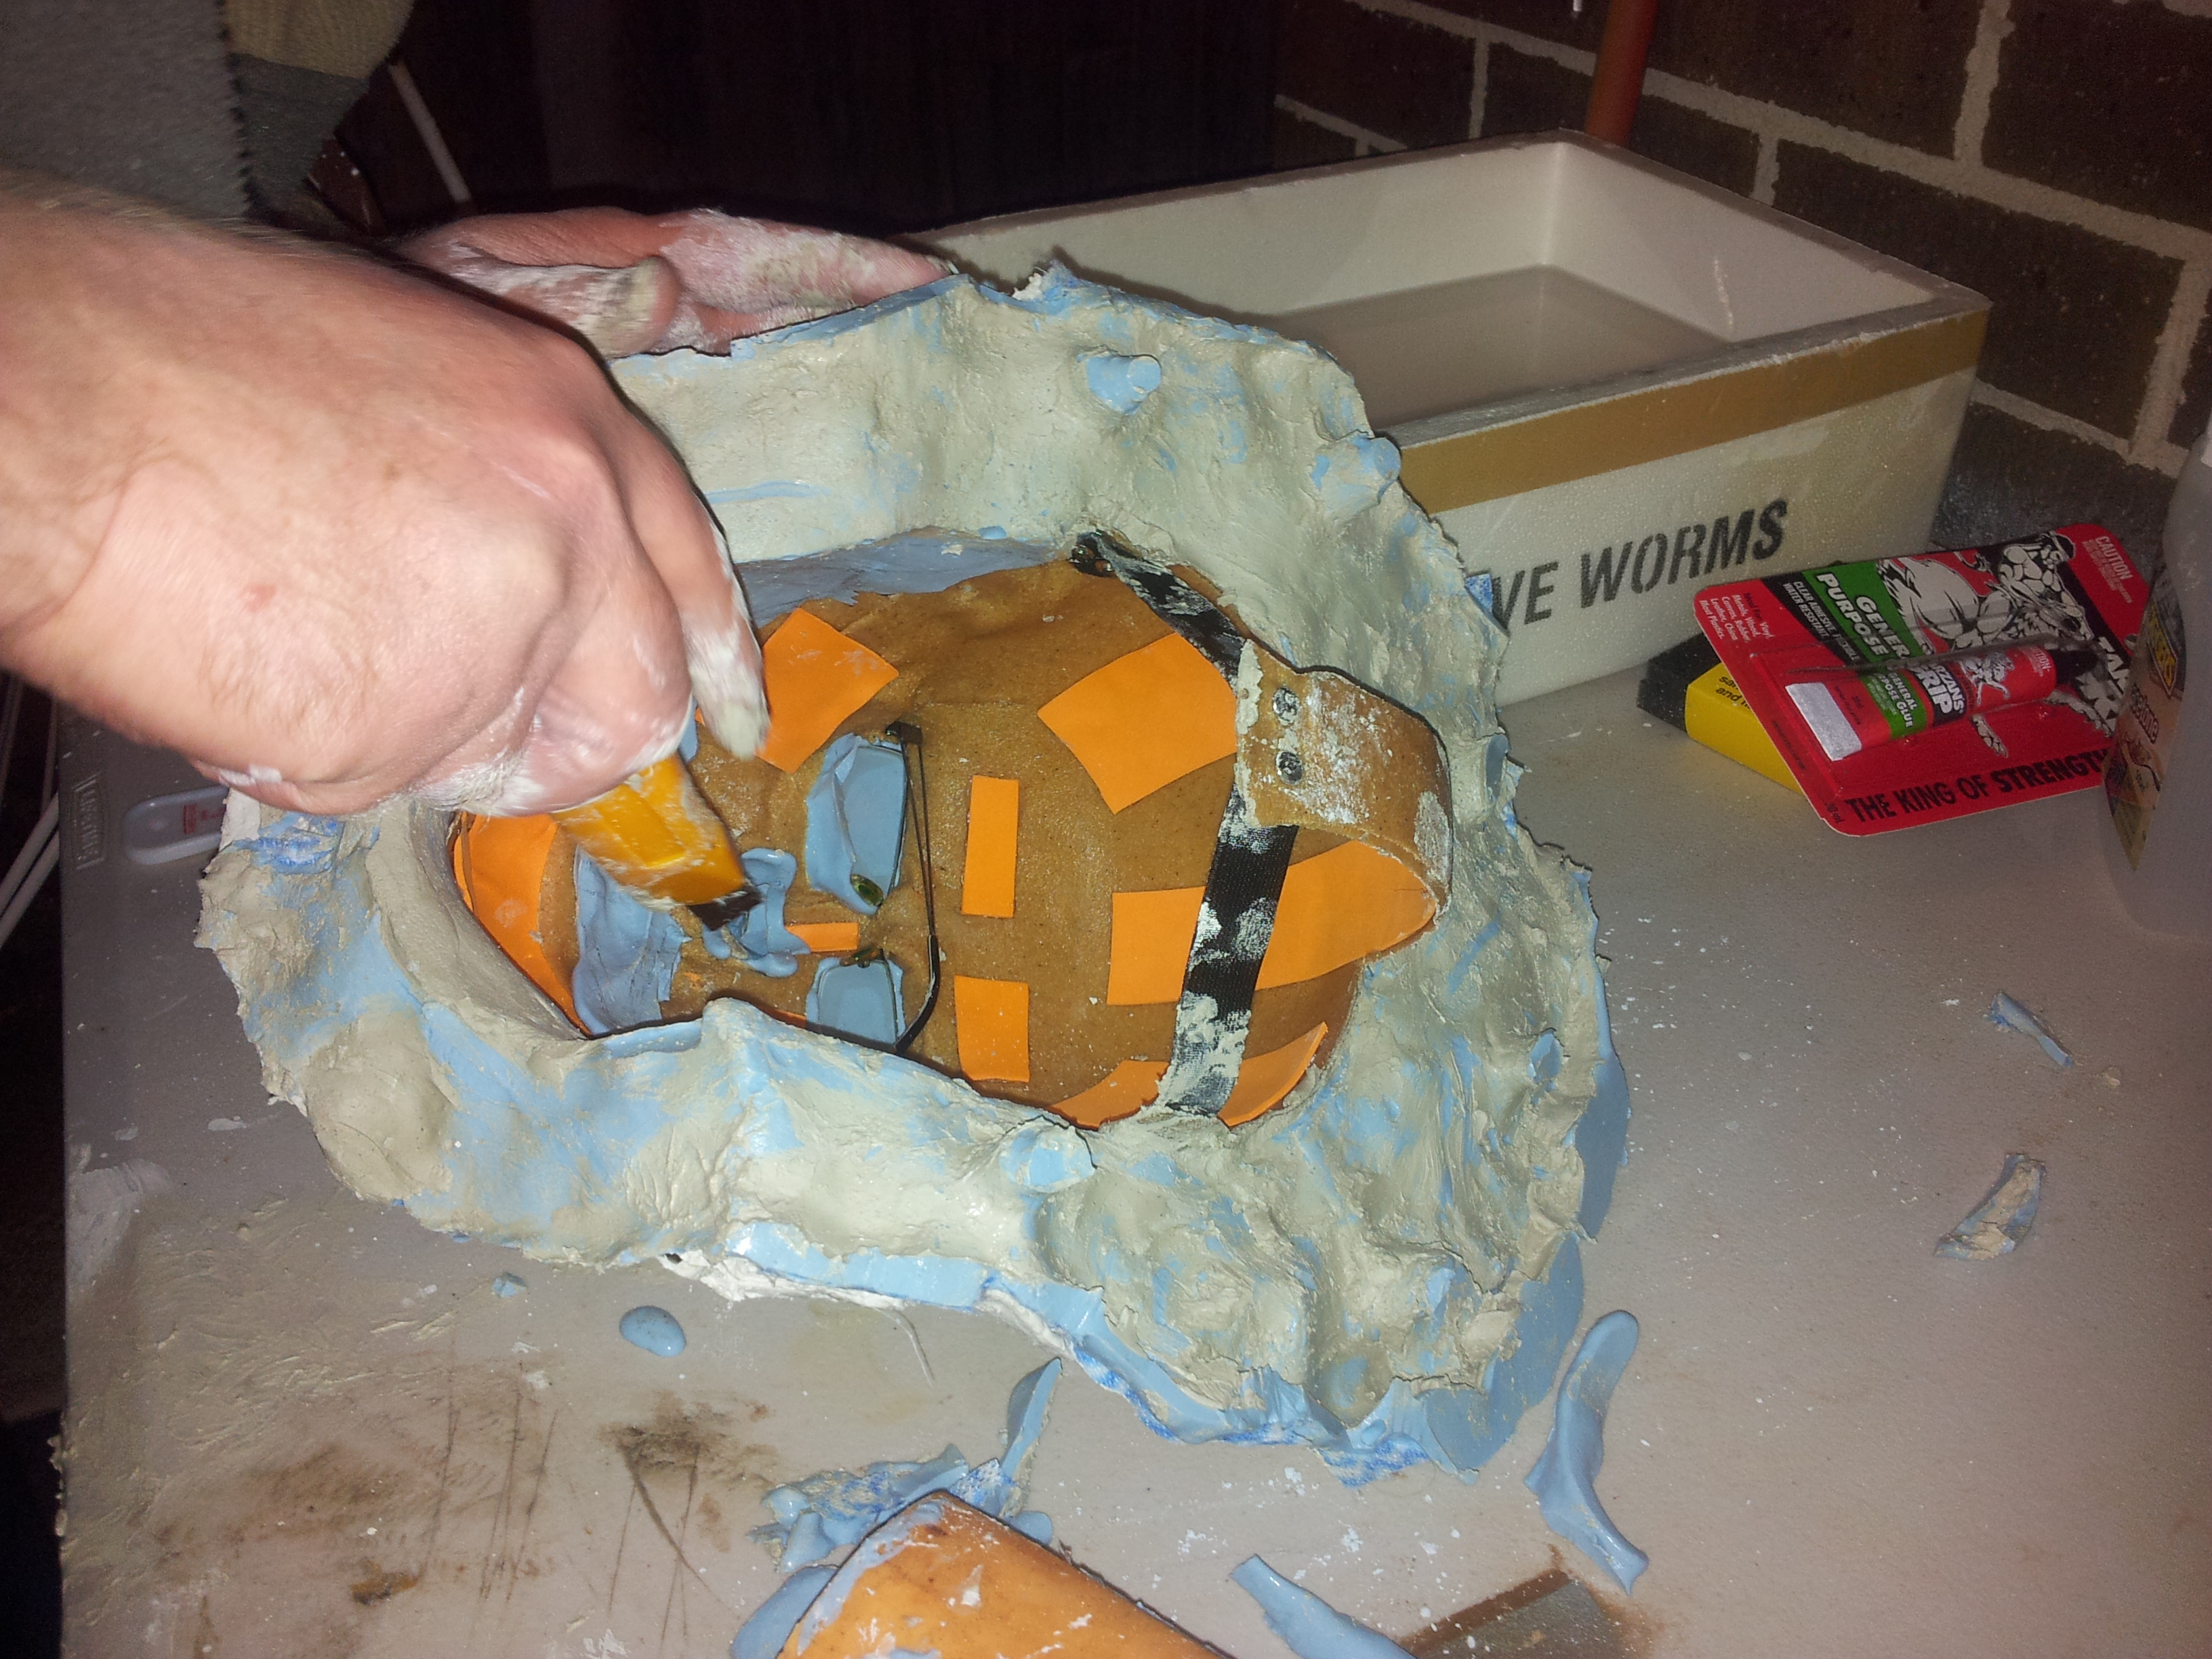
Photos – April 2015 – the underskull work is underway. Back of underskull with balance strip and elastic grip. Front including glasses and temporary jaw connexion. Inside of mask with 2 mm foam strips for comfort. Note that the elastic got riveted in to the skull after most of these pictures were taken.


The hinge of the jaw is very simple. The nose and eyeholes were cut out wider at a late stage, to stop classes steaming up.

The skull is bonded to the silicone face and the hood by cable ties. I poked holes with a soldering iron and a knife and threaded cable ties through at many locations, and just tied them off. To remove the face or hood I can just cut the cable ties. It is quite secure, without the mess of any kind of glue.
Lip curl
Ideally I will include a lip curl mechanism in the skull. I am still working on the plan for this mechanism. This seems difficult and may get dropped.
I did some preliminary work adding a lip curl wire to the underskull. But this was before I finished the teeth and the silicone skin. I have had to remove this wire. It might get added again when the skin is finished, we will see.
The current mask has silicone FAR too thigh for a lip curl. Maybe in a future version.
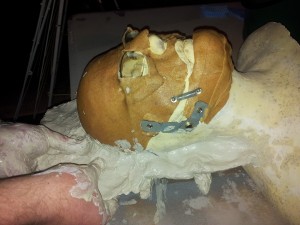
Casting the underskull
On 1 June I finally came to casting the underskull and making ready to mold the actual face for the wookiee.
My plan is – the Worlba underskull in pics above will be cast in alginate (making a negative of the skull). A positive of the underskull will be made from this negative in fibreglass. The fibreglass positive will be used as a base to mold the clay face. This clay positive will be cast in fibreglass to make a fibreglass negative. The positive fibreglass and negative fibreglass will be clamped together to make the mold for the silicone skin. There will be a variable thickness in the skin, some places such as the snout and brow will be deep, other places less so.
I would not have tried this process at all without the experience and assistance of my fried Luke. Actually, its more like he did this and I was just his assistant. This is all his plan. Luke called on the expertise of his own SFX teacher when planning this work. Don’t try this without at least two people would be my strongest advice. Having someone ‘dry’ to get more alignate, cut more plaster, etc., is very useful. And maybe someone else as your cameraman…
Since I have not seen any really step-by-step runthroughs of this casting process, I am going to summarise it here. In case I want to ever do it again…
- Prepare all your materials – pre-measure alginate, plan sizes and pre-cut plaster bandage, pre cut Chux wipes. Safety gear such as gloves. Plan for what buckets of water you will need, one for clay, one for alginate, one for plaster, etc. Check your clay is not dry – this almost shot down our plan to start with, we had to soak the clay for hours.
- Place underskull on bust or other support. Cover or pack out springs – otherwise alginate gets inside and you cannot cut it out easily.
- Use water based clay to form a broad halo around the underskull. First build supports of clay sticking out from the bust, then a platform of clay around the head and up over the neck. Make the clay surface as smooth as possible against the bust and on the flat surface – any bumps will be transferred to the fibreglass. Making it smooth will give a better seal.
- Place holes in the clay around the edges to form points that will lock the positive and negative fibreglass mold together.
- Mix the alginate as per instructions. Add water to alginate gradually while mixing fast and smoothly (we just used hands to mix).
- Place alginate over underskull. Start at the highest point (the nose because the bust is lying down) and let the alginate fall down sides. Try and make at least 1 cm deep all over. Smooth alginate in long strokes.
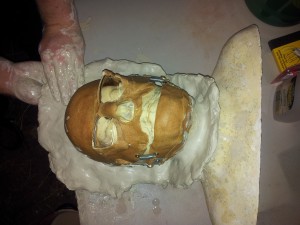
- Place Chux wipes (cut into small pieces) over alginate. These should cover most of the alginate surface area. Push in slightly to ensure Chux becomes wet. The plaster will not stick to the alginate, so the Chux forms a layer the plaster can stick to.
- Allow alginate to dry.
- Prepare plaster bandage. Use bandage in layers of 3 – any section is 3 layers of bandage folded over. Have large flat sections and long thin sections.
- Place bandage over alginate/chux. Large flat pieces first, then long ones around the edges. Doesn’t need to be many layers, just one to two overlapping layers. Ensure all the alginate is supported/covered by plaster. Make a ridge around the edge of the halo for support/structure. Make supporting structures down the length and across the face, ridging the plaster bandage.
- Allow to dry. – Cold and wet temperatures will not let the plaster dry – don’t do this outdoors on a winter’s night, like I did!
- Remove the wet clay support.
- Remove the whole thing from the bust/support.
- Remove the underskull from the alginate cast. Cut carefully any excess alginate, especially where it has come inside negative spaces in the underskull. This bit was very hard – the alginate curled inside and gripped and sealed in a lot of places because of how rough the mask is. It took us a while to realise the springs were preventing us from removing the mask.
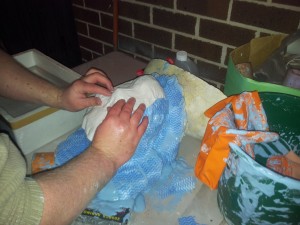
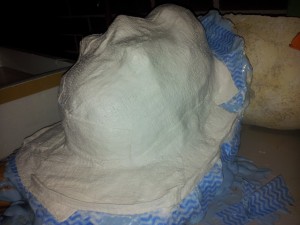
I didn’t get to got on to the fibreglass stage the same time as I made the alginate cast. Because I started this at night instead of on a nice sunny day. So we have to store the algniate cast for a while. To do so, we packed it with dampened Chux wipes and wrapped the whole thing in clingwrap. This will keep the moisture in and prevent the alginate drying out and shrinking. Plan is to get the fibreglass cast done as soon as possible, the next night.
Photos!

From top left to right – Alginate was the most expensive single item in this process. The bust before starting. Building supports for the clay. The clay halo.
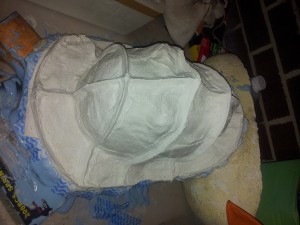
 Putting plaster over the alginate and chux. A ridge is formed on the outer edge of the plaster. Supports down the length and width of the plaster are made for support of the whole structure.

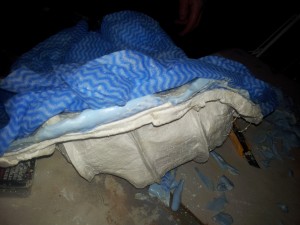
Removing the clay from the mold. Removing the mask from the mold. Packing the mold with wet chux to keep it moist over night.
Next step – sand the fibreglass back to make it safe to handle. This used a lot of sand paper – or maybe my technique was poor.
Anyway, eventually it was sanded and time to sculpt mask.
It has taken two weeks to make a face I am happy with out of wax based plasticine. Luke has lent me his plasticine for this. I have at least three times declared to myself that I am happy with the face, only to ask Luke or my husband or others and have them point out this or that being wrong. The muzzle is too short, or too long. The nose is more ape or gorialla – doesn’t Chewie have a dogs nose? The muzzle is too wide. Etc.
I went to see The Lion King on stage one afternoon, and that changed my ideas for the mask again. I loved the lion masks, Scar and Mufasa, naturally – who doesn’t? The long flat nose shape inspired me. I decided to use a cats nose for my mask. So I has a rather large, broad nose modeled after a lioness, which I will colour dark brown instead of black. I hope this comes out.
I have used a few drawings of Wookiees from the internet to design my face, along with many pictures of Chewbacca and other’s builds of Chewie and Wookiee costumes. The forehead is very tall. Without hair it looks like a monkey face really.
pics to follow
The Hair
Colours and Buying
I very quickly decided on the Kanekalon hair model. But getting this hair in Melbourne, Australia? Not as hard as I thought!
I scoured the internet for ideas of styles and looks for the Wookiee. I did not want to use the same colour as Chewbacca, I wanted to be different. I liked the idea of a smoke grey Wookiee. Unfortunately getting grey hair is not so easy, so I settled on red hair. A red roan and blonde Wookiee.
At first I ordered an array of full length hair braids as samples from doctoredlocks.com. This was a mistake. I paid over $100, including shipping costs, but I ended up not using much of this at all. So if you want samples, try and get a sample ring, not full braids…
Second mistake was not looking around local shops first. It turns out a local hair braiding store had hundreds of Kanekalon hair braids in various colours and brands. Not the same brands as available online though. I could have found what I was looking for locally, so now I regard the first order from online as waste money.
Another thing to note – the colours received from the online store and the local store were in some cases VASTLY different. I mean, the same colour number/description of Auburn in the online store brand was really a dark brown, while in the store it is a much brighter red (truly auburn). So shop around brands too to settle on your colour, and ensure you get the same brand every time.
So after settling on my colour scheme – red and blonde – I went to the local store and was surprised to find that the store had everything I needed already in stock. Of course the braids were all more expensive than I would pay online, but I had given myself a good idea of prices before going in to the shop. The shop owner offered reasonable discounts, but couldn’t match the online prices. But I decided to buy there anyway. 50 packs later, I paid slightly more than I would have for the same amount to be imported. That is, I paid about $50 more. But I decided that I would pay extra to buy locally for two reasons. Buying locally is good – helpful to a small local store instead of paying a larger online company my money. And I can go back and get the same brand easily if needed.
I got four colours, with the intention of blending the colours together. Auburn (30), dirty blonde (27), platinum blonde and a darker brown (dark auburn, also 30). I purchased about 35 Auburn, 5 dark auburn, 10 dirty blonde and 10 platinum blonde packs. I think, anyway, I have not kept count of how much hair I have used. The blonde ones were more expensive, but I still got some discount on them. Notably, the ‘dark auburn’ and ‘auburn’ colours I am referring to here are actually the same Kanekalon number (30), but in different brands. So brands matter when getting colours – don’t mix brands for the one colour would be my advice.
Update – as of Dec 2015, I estimate I have purchased up to 60 packets of hair, possibly more. Had to go back for more when doing the stilts.
At about 20% of the latch hooking done, I am happy with the hair colours chosen. I have mixed the platinum and dirty blondes for the blonde patches, and blended auburn, dirty and platinum blonds at the edges of blonde patches before moving into solid auburn.
I have noticed quite a different quality between the hair colours while working with them. The platinum blonde straightens easily and feels finer than the dirty blonde or auburn colours. The dark brownish auburn is VERY fine, even more so than the blonde, and weaker (breaks more easily). Maybe what I got was not genuine Kanekalon hair? Remembering that each is a different brand, I’m neither surprised or worried about the hair quality.
Straightening the Hair
The Kanekalon hair straight out of the packet is somewhat wavy. According to other blogs, many wookiee builders use heat such as a hairdryer to straighten their hair before use. I have tried this, but I would call it only a qualified success.
I immediately chose the hot water method for straightening. Blow drying every bit of hair sounded too time consuming.
To straighten I used my largest pot on a camp stove burner. Once again because of my LARP club gear I have a stove and heaps of partly used butane gas canisters in my garage (in fact I have more than 20). So no expense for this. The 4 L pot I chose is too small – but its all I had. I would recommend going and getting a truly large pot if you can – but that may need a matching large burner as well…
So to straighten – heat the water to boiling, then turn down the burner. Dip the hair in for a few seconds, then hang to dry. Easy? Well, I found some complications:
- Bubbles – bubbles from simmering water cause tangles in the hair. But I am finding that the hair is not dead straight when I take it out, so I am putting up with s
ome bubbles and keeping the water on low heat. - Long hair tangles – I tried straightening half or whole bolts of hair because I did not know what length I wanted. Tangle much worse than the 16 inch cut hair lengths. Definitely try to cut your hair to useable length before boiling. Tie each length with a hair tie, and it is now easy to handle and hang to dry.
- All hair is not equal – each colour and brand is behaving differently in the water. The platinum blonde is the most wavy but instantly goes dead straight in the water. The auburn hair seems a bit hydrophobic and doesn’t wet through easily, and thus doesn’t straighten as well. The other colours are in between.
- Do it all at once? No, not me. I am only boiling in batches of what I think I will use for a while – or for as long as I can be bothered at the time. This way I will not waste or cut up too much hair, and have long lengths left for the mask, etc.
Straightened hair is not straight – only the platinum blonde has come out dead straight using this method. The other colours are still somewhat wavy. In the case of the red auburn I am not sure there is any benefit at all. But I use it anyway – no time to care.
Post latch-hooking hair straightening
It is March and the suit pants are pretty much done. I have briefly experimented with a brush and hair-dryer, trying to straighten the red hair more. My success was limited – in fact I think I managed to heat in tangles instead of straightening.
It would be nice to be able to get the hair totally straight, but I think it may become more trouble then it is worth. For now I am forgoing straightening, but I may revisit later.
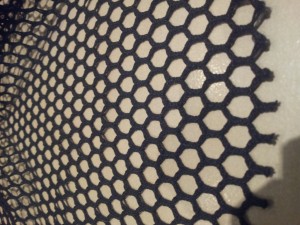
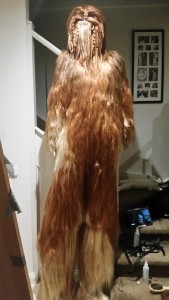
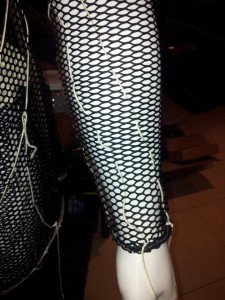
The Mesh Suit
 Pattern and Sewing
I used various online blogs and references for designing the mesh suit. I am not going to list them all here, but just discuss the philosophy of the suit design I used.
I tried to make a suit myself at the beginning. This seemed to be going OK – I am horrible at sewing , and my machine was a bit old, but it still seemed to be working. Then when I started an experimental hook of hair, I realised quickly that I had cut the fabric incorrectly. The hexagon holes of my suit sat at an angle to the ground, and I could not get the hair to lie flat. Waste of time and material. I asked my sister (my sewing expert) to sew the suit for me, and she has ensured the nap of the fabric (orientation of the holes) is correct. Phew!
 Observations about my suit:
- NAP! Pay attention to the size and orientation of the mesh holes. Make sure fl
at ends (from hexagons) falls in the right direction, toward the ground. - A simple pajama or tunic and pants pattern is quite sufficient for this. We happened to have a lot of paper patterns to choose from, but you can just make up your own if you want.
- The suit was sized with me wearing a T-shirt and jeans – since I will wear some full length clothing under the suit. This may be hot, but I don’t want the suit to irritate the skin especially as it will have glue all over the inside.
- My suit was made to measure with the intention of the arms and legs being reasonably tight. I reasoned that the mesh material would stretch during the latch hooking process.
- The crotch was left low and loose after the recommendation of another wookiee blog. Allowing for extra movement, this may be important for using stilts especially.
- The seams are mostly capped with a seam tape. Colour of this did not matter, this will certainly be covered by the fur.
- The neck hole is quite tight, and ended up good at the back but too tight at the front. This will likely be loosened and opened up. However this I will keep until the very end, when the mask is available, so I can be sure of the overlap between suit and mask.
- The arm holes especially around the wrists are VERY tight. However I have not modified these in hopes they will stretch a bit but not too much, so as to grab the gloves.
- The top hangs down over the pants quite a lot. At the front there is a gently rounded overhang, at the back is it not so deep.
- There was intended to be large rounded overhangs on the end of the limbs – flaps to fall over the hands and feet. However these did not end up on the finished suit – not enough material I think. I may add these as removable parts if necessary later.
- Suspenders – the pants are made with elastic waist encased in simple calico. The calico waist is reasonably large. I intend to use suspenders on the pants to help with the weight of the hair.
Outlining and Design
Designing the colours of what would be blonde and what red took a little while. I am neither a very creative, artistic or visual person, so I have trouble envisioning what I want. I scoured the internet for pictures of wookiees. I also looked for natural arboreal animals and other animals with red or roan coats. Wolves, sloth, fox, etc. featured in my collection. Also orangutan, as these have the closest facial features to wookiees I think.
I decided to blend the colours from red to blonde on the lower limbs. The chest would be lighter blonde, but I am still not quite clear on what this will look like. The back and shoulders will feature a darker brown colours, blending down the spine into the red. The face will be blonde and red I think, though not sure at this stage. These features of dark on the back and light on the belly mimic the natural colouring of most animals, especially arboreal animals.
I eventually got a sketch of a wookiee from online, and just used the spraycan function in Paint to colour it generally. This is the only guide I have for colouring – other than this brief sketch, I am just making it up as I go.
Front Back (ignore the face)

 NOTE: It didn’t turn out this way! I changed things as it went along. Now the front is mostly red, with dark brown coming down over the front of the shoulders. The blonde patches are limited to the arms, under the arms and upper legs, and lower legs.
Outlining the patches on the mesh was done with a simple cotton yarn. I had intended to use multiple colours of yarn to indicate to myself which colours to use in which patches. As it turned out however I lost all but one of my balls of yarn. However outlining in just one colour has been effective and I have not gone back.
To actually put the yarn through the outfit required it to be held on as it would be worn. My mesh suit has been sized for me only – my husband could not model it for me while I did this. Solution – mannequin. I happen to have access to several male mannequins from my LARP group. I moved one into my lounge room, put the suit on (not easy! he is not my size!) and I have a ready made model.
 Getting the yarn through the mesh took a little bit of thinking. I hunted for some curved upholstery needles I had around, but could not find these. I tried tying the yarn to a chopstick (in lieu of a knitting needle) but this was awkward and fell off a lot. In the end I created a ‘needle’ out of a large paperclip! By twisting it around I got a repositionable needle end that I could easily hook through the mesh, and a small loop to carry the thread. Simply using a latch hook to pull the thread through would also be easy to do, if you don’t have a needle.
Yarning the suit, as I think of the outlining, did not take long. A couple of hours at most – including thinking time. I did the lot by guesswork. I just looked at the model and guessed where the hair colours would be. I tried to match patches on the arms with patches on the sides of the torso and pants. Thus when the arms are against the body the hair colours will kind of match up.
 Importantly, where the top overlaps the pants the colours must match. So the yarn lines on the top must match the yarn lines on the pants. This wasn’t too hard to acheive on the mannequin. I should have tried it on myself to ensure the overlap still worked, but I was lazy and did not do this.
I tried to assume a hair length of 8 inches, but honestly I could not really imagine how it would fall. So this is very much trial and error. I have just made sure that there is no abrupt red to blonde changes, there is always a patch of red/blonde in between. The hair is going to hang down a lot over the patches I have created, so the end product will probably be quite different from the outline.
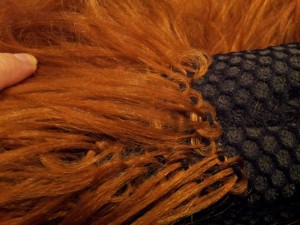
Latch hooking
 I started latch hooking at the bottom of the pants and the bottom of the back of the shirt. At first the whole lot was on the mannequin. But I quickly found that sitting in my favourite spot on the couch, leaning over to reach the pants, was awkward. I have since removed the whole lot from the mannequin and are handling it directly.
At a late stage, when mostly done, it was convenient to put it on the mannequin to see how the hair falls. Especially for thickening up the arms and shoulders where the hair was too thin.
A rolled up towel is excellent for holding the legs in shape, but allowing me to turn it inside out for gluing. I tried using an embroidery hoop for the top section. This worked OK. However a large section of cardboard holds the material flat well enough as well, and allows for quick adjustment. A towel is also good for holding the top. The embroidery hoop was abandoned very early on.
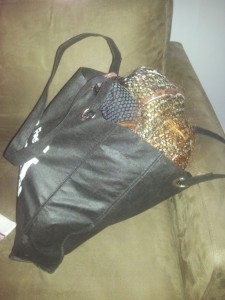
Both these methods (cardboar
d or towel to hold shape) are very transportable. I tend to take one or both parts to my regular gaming sessions, and latch hook while playing a board game or tabletop RPG. So I need to be able to pack hair and suit and tools all in a bag. I had to upgrade to a bigger bag as the suit top got more hair on it, as it gets very large to carry.
Photos – my Wookiee ‘go-bag’ with everything I need to work, latch-hooking while playing D&D and other games,a rolled beach towel stuffed into the pants makes a great working surface.


How much hair and latch hooking technique
Observations about my technique:
- I am using 16 inch lengths, which become 8 inch lengths when looped. My actual cuts vary between 14 and 18 inches – I am not too careful as I know it will fall out and be trimmed, etc.
- I am placing hair every second hole. This works out to slightly more than a loop an inch on my mesh. It works out to be a diamond pattern. Keeping it consistent is impossible – one section will not line up with the next when you get seams in the way. Just work around them and interrupt the pattern if necessary to ensure the hair is thick enough.
- The amount of hair used per loop is variable. I don’t choose this too carefully. Too much hair and the loop doesn’t pull tight. Too little and it pulls in very tight. My amount of hair leaves loops loose until I pull them in after gluing.
- I probably use too much hair – it is coming out quite thick and a lot is pulling out even after gluing. I don’t care though, I will clean it up at trimming time later.
- Using hairdresser type large hairclips to keep hair out of the way is useful. Especially since I complete in hair sections, so holding nearby complete sections away from the working area is necessary.
- A latch hook with a bend or angle in it is easier on the hands than a straight one. Doesn’t seem like much, but my hand doesn’t get as sore.
- I sometimes hook across rows or sections, and sometimes do vertical lines. I find doing the vertical lines to be fastest and easiest.
- I am right handed. I work by putting the latch hook through from ‘top to bottom’ of the fabric. This means lying the bottom of the fabric on my left and top on my right, and working left to right to make the vertical lines.
- Care should be taken to ensure the loops of hair all sit in the same way. Sometimes the loops flip up if pulled too tight, or get hair from another strand caught up. These things will result in the hair not sitting flat.
Photos – Latch hooking close up, mess of prepared hair in my latch hooking nest on the couch in front of the TV.


Later observations
- My technique is producing quite dense fur, but I was happy with it for a long time. I seem to be hooking more frequently than other builders.
- I noticed that around the tops of sections, where there is not enough hair to hang over it, the fur is not dense enough. Especially on the arms and upper shoulders, the mesh and hair loops are visible. To combat this on the arms and shoulders I doubled the amount of hair by not skipping columns and placing hair at every column in the mesh (but not every row, that would quadruple the hair amount.).
After trying on the ‘finished’ suit, in May 2015, my sister notice too many gaps. Even with double thickness on the sleeves, sometimes the mesh shows through when I raise my arms. Also on the legs when I sit or bend the knees the mesh shows. In the end I decided to double the thickness on the entire suit, essentially doubling the amount of hair I used.
The shoulders have been particularly hard. I’ve hooked hair into every loop I can reach, laying the hair along the shoulder length away from the neck. But I still feel its going to show the mesh here. I am hoping the mask hair will cover this, if not I will have to glue lengths along the shoulder.
Photos below – around the shoulder and the arm using normal hair density. Close up of auburn hair with double density to eliminate gaps – used over all arms and shoulders. I progressed to thickening the entire torso, and eventually the entire suit.


Hackling (mixing hair)
To mix the colours, I am taking a pinch of each hair and just hooking it in together. No extreme mixing of hair, or hackling – only because I did not get the equipment to hackle it. And admittedly I did not examine this technique much before I started.
So at my guess of more than 60% latch hooking done, I finally get myself some useful brushes. Pet brushes from the $2 shop. I decided to try hackling the hair just using the pet hair brush – that’s mixing it by drawing through a brush. Guess what?
Hackling is FANTASTIC. WHY DIDN’T I START THIS WAY! In other words, make the time and effort to hackle (is that the verb?) the hair to mix colours. It will look much better.
I will certainly do this for the rest of the suit – especially the mask.
That being said the overall look of the not-completely-mixed hair is still good, I’m not unhappy with it. Just its even better when hackled.
Gluing the hair
 I am gluing every loop of hair to the mesh. This is very messy, but if I didn’t the hair would just pull out. I have chosen ‘ribbon glue’ initially, then moved on to fabric glue. Anything that is designed for a garment should be non-irritant and wash proof, I reasoned. As it turns out, fabric glue is much better than ribbon glue. My key observation about the glue is that you want something thick enough not to run between the hairs – else capillary action results in glue running down hairs and sticking lengths together, instead of just around the mesh.
I started by latch-hooking a row of hair, then gluing it, then going on to another row or another location. Very messy and time consuming. Now I latch-hook a section – size varies, usually whatever I have gotten done that evening. Then I turn it inside out and dab glue on every loop cross (they are loose and look like crosses on the back). I let it dry overnight, then turn it back the right way and tighten each loop by hand. This is very time consuming, but effective so far.
The loops are certainly not perfectly glued in or tight after this process, but they are stable. Only a few pull out entirely. Occasionally if I spot a patch missing (easy to see inside out) I go back and add one or two loops or hair, but I will also check for this at the end.
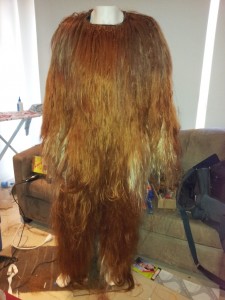
Photos – Suit laid out on ironing board inside out for gluing – with cardboard inside, not visible in photo. Messy gluing of arms – very difficult to keep hair neat when it is dense, turning inside out pushes the unglued loops out of place and makes a total mess. Arms are a disaster areas, but other parts of the suit the gluing was reasonably neat.


Brushing the Suit
When the pants were finally mostly done I put them on the mannequin and brushed them out. It is amazing what a simple brushing can do! See partly brushed photos below.
I am using pet brushes from a $2 shop. I have already destroyed two human hair plastic brushes. The pet brushes are hardier, but I am still killing them in a night of brushing work.
As you can see I lose a LOT of hair brushing it out. However, it seems nothing to worry about, the hair is still very thick and I have not had to patch any gaps (yet!).
Photos – unbrushed on left side of suit, brushed on right


Time
I take the work with me whenever I can – such as to my regular roleplaying nights. Its quite easy to play a board game or roleplaying game while working on latch hooking, once you have the hang of it. But hair still gets everywhere! I even took it out to work on while picnicking in the gardens before an open air Shakespeare performance. Latch hooking requires dedication!
After about three weeks of latch hooking, I was about 20% done. My methods are a bit time consuming, and I am still finding out ways to do it better.
As of mid March and therefore 8 weeks or so of work, I am about 80% done with latch-hooking. The pants are pretty much done (but not the extensions over the stilts) and the top is over 50% done. By the start of April I am 90% done, nearly 100%. Just thickening up sections that are too thin.
By mid April the suit is 100% done – in terms of latchhooking. That is 3 months work, give or take. But I regard this as only perhaps half of the suit work – the mask is much more difficult, and the voice, hands and feet need completing too.
Gloves and hands
To mount the voice electronics, I need to wear gloves.
I considered not having gloves at all, and using a half-glove mesh cover with hair over my own hands, to allow full dexterity. This I will probably stick with as an optional part, but for the complete suit and voice I need gloves.
At first I chose gardening gloves – expensive ones with tight fitting fingers and a leather palm in yellow to match the suit. But eventually I decided against gloves and just latch-hooked hair into fingerless mesh hand covers – a kind of goth thing. Don’t know what to call it. Cheap – $2 from a trash and treasure store. Suede was glued to the palm and around the leading edge of this glove. The electronic buttons have been sewing inside.
pics to follow
I am making small claws for the fingers out of a mouldable plastic – http://www.plastimake.com/examples
The claws will be worn as fake nails – I have trialed attaching claws to press on sticky back nails, but these came off within a few hours. I will use more permanent fake nail glue. I have dipped plastimake into nail polish remover – for 10 mins – and it didn’t seem to damage the plastimake, so removing the claws should be ok.
I also saw a video of Adam Savage getting into a Chewie costume. I don’t know who made the suit to give credit to. But the hands appear to be gloves with latex or silicone fingers. See video below.
Feet and stilts
I have a pair of medium Giraffe stilts. I have adjusted them for me, but not really trained with them much yet. They are set at minimum height of 18″, which will help change my 5’6″ to just about 7″.
I intend to form leg extensions for the costume separately for the stilts. Hence the costume will be complete without the stilts, and they will have their own foam and mesh and hair coverings.
For claws I intend to use the Plastimake plastic again.
The feet started out as foam spats over my everyday shoes. It was the work of just one afternoon – and evening, OK so about 7 hours – to fashion and cover spats. These are 10 mm foam (but don’t quote me on that, it could be 8 mm or 12 mm) wrapped over shoes, glued with hot glue and held in shape with a little elastic. The shoes had to be removable from the spats, so I can use them on any shoes I choose to wear.
I then formed some big toe shapes from the foam too. The whole lot is covered in my ‘skin’ – a fine suede from one piece I am also using on the hands. They are really ugly at the moment, but I don’t mind since they will be nearly entirely covered in hair and you will not be examining them closely. Then I added claws of Plastimake. Hair yet to be added using a felting needle or glue.
The covering of the shoes took up a lot of suede, I will not have enough left to do this on the leg extensions too. Still, I managed all this and the palms of the hands from one small side of suede – a couple of square feet.
Initially the feet did not fit over the stilts, but I modified them so they include velcro closures and wrap around themselves.


Photos – ugly feet made of foam.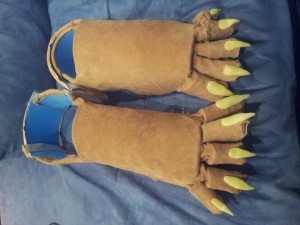
Adding the hair to the feet wasn’t as easy as I had hoped.
I had wanted to use a felting needle to stick in the hair. But a lot of work with the felting needle produced only a fraction of the hair actually sticking in. It seemed the needles I was using just were not picking up the hair well. Although what was punched in was nice and secure, it was too slow and damaged the suede too much.
I switched to gluing the hair directly to the suede. This was much faster, just a bend of hair dipped into glue and attached in rows created nice dense hair on the feet. Beige coloured velcro couldn’t be covered in hair but blends so well with the blonde hair its hardly noticeable. Also the velcro was placed on the inner side of the show where it will be less visible anyway (on the non-stilt version) or toward the back (on the stilt version).
I can see how gluing the hair to a suit could actually work out, after doing these shoes. However gluing hair is messy and I feel it would be less reliable and come away far too easily. Only good for small parts or a quick and dirty approach to a suit, that is my opinion after this experience.
pics to follow
In 2017 the feet got an upgrade.
The toes of the spats saw frequent damage and dragged on the ground as a I walked. So needed replacing.
After meeting another Wookiee maker at a Star Wars 40th anniversary event, I had big ideas for replacing my spats. The new idea was to use mocassins. Another stilt walker costume (Slenderman) that I had seen in the USA used a pair of sneakers actually over the Giraffe stilts. I decided to combine these ideas.
I sourced the largest pair of mocassin boots I could get (only mens size 13) in tan/beige colour. I cut these along the seams, and at the back, to allow them to be pulled over the stilt ends. Then tested – yay, they fit, if only just. I then glued some small elastic tabs into the cuts, so that the mocassins would be whole and not flop open at the back. The idea is that these mocassins will also fit over any normal shoes, or a smaller pair of mocassins (also beige and purchased at the same time) so I don’t need two separate sets for with and without stilts.
I tested the stilts with full mocassins on before moving on – in case I needed to cut out the sole of the mocassins. However, walking around on the stilts with the full mocassins on was only marginally more unbalanced than without – so I am taking the risk and wearing the full shoe over the stilt ends.
Fortunately I was able to pull off the hair stuck to my old spats in a complete layer – that is, pull off the suede from the foam in one piece. I had only a couple of tears. Also the toes were pulled off complete. So I set about re-glueing the toes to the new mocassins – making sure they sat above the sole and off the ground. then the hair was attached as layers of the suede. This process was a bit messy with glue everywhere and heaps of pins to help it stay in place while setting. I am still finding rogue pins in places. But after a couple of weeks working on weekend days and weekday evenings, shoes are done.
Voice and Electronics
Voice electronics is a crucial part of this costume endeavour. A Wookiee without a voice isn’t very useful for a LARP setting.
I decided immediately that the Wookiee would have both a Wookiee Voice and a voice changer for my own voice to sound like a translator device. I have a background in electronics engineering but I have not worked on a circuit for years (I’m a physicist dammit!). So designing my own was out of the question. Still, I know how to string electronics together, so this step was not intimidating.
Finding the voice changer was easy. Many electronics stores or toys can be used for this purpose. I chose to purchase a circuit from Eletronics123.com, along with my other electronics purchases.
Locating and designing the circuit for the Wookiee voice was harder. I wanted something that would continue to speak while I spoke and shut off when I stopped – in other words a VOX circuit. Finding a VOX relay switch is easy, once again many electronics stores carry this. The circuit to play a Wookiee voice was the kicker, so to speak. I purchased a kit (USB5M kit assembled!) from Eletronics123.com, which holds up to 300 seconds of sound, and has 4 press-button activation.
Before the electronics actually arrived, I spent some time on the internet searching for sound effects. Downloaded about 20 samples. Mixed samples and increased pitch by about 4 steps using Soundforge. However, after playing on small speakers, I decided that the pitch was too high. Note that pitch seemed to be affected by batteries – too low batteries means sounded higher pitch.
The electronics arrived from Eletronics123.com, then I purchased more sundry items to connect them up from Jaycar. However, after loading sounds onto board and testing, I connected the VOX relay system – and blew something in the soundboard. Needed to get a new one.
I purchased two new playback boards from Eletronics123.com, just in case I kill another board. These arrived very quickly.
I didn’t start the electronics again until April 2015 – after finishing the latch hooking. This is my current major project for the suit.
I have spent maybe $200 on additional electronics at the local store, besides the 4 circuits needed for the voice. I purchased basically everything from scratch – new soldering iron and tools, toolbox, heatshrink, wires, enclosures, batteries, everything. If you already have a good electronics kit lying around, or if you are good at scrounging and bargain hunting this won’t cost you so much – but I just paid for convenience. Also I paid for backups – I have extras of practically everything except the major circuits, in case I ruin items (which I am wont to do).
The plan is to have push buttons mounted in each glove, at the bottom of each finger. These can be pressed by my thumb. Seven of these (4 on one hand, 3 on the other) will activate a sound sequence from one of the USB5M boards. Both boards will be connected to the single speaker, which I will wear around my neck on a choker (along with the microphones). I decided not to place the speaker into the skull itself, so that it is easier to access in case of failure, or I can just turn off and take off all the electronics if I don’t want it.
Secondly a voice activated relay (VOX kit) will be connected to the last button, which SHOULD activate a loop of Wookiee voice whenever I speak (microphone placed under mask). This is yet to be tested, but I checked the theory with the supplied Electronics 123 and they gave me instruction on how to acheive this.
(Update 2017 – this part never worked. The only voice I have is button activated Wookiee sounds. Voice triggered sounds were not achieved.)
Finally, a second microphone will have to be placed near my mouth, but again not a permanent mount. This microphone will be connected to a voice changer and speaker carried on my belt or vest, giving me a ‘droid’ voice. I have also got an Iron Man toy mask and a sound level meter LED kit that should serve as a droid with eyes that light up when I speak. Thus this last stage is an if/maybe, a nice to have but it may not get completed.
So far – after just a couple of nights work – I have connected up the speakers to the USB5M kits and extended the microphones so that I can put the wire throughout the costumes. I am currently trying to decide if I mount both the USB5M boards in the one enclosure or have them separate. Separate is two boxes to carry instead of one, but one box means I have to string wires all the way across my body, also not good. Also, do I wear the boxes under the suit (which is quite tight to begin with) or place the boxes in my vest / belt.
After several more long evenings of work I have adapted enclosures and extended wires so that I can run the buttons for the USB5M kits to my hands with the boxes in pockets under my top. In the process I managed to damage a pin on another USB5M board, so I needed to order more (again). The connections between the buttons and the board use very narrow and delicate wire, and this easily pulls off if too much stress is placed on the wires. This was the origin of the damage (followed by me killing a surface mount chip while trying to make repairs). The surface mount parts mean it is impossible to repair these boards for any serious damage, but they are not overly expensive to replace (unless you are shipping halfway round the world like me…).
Update 2016 and 2017
Windows 10 killed my electronics. That is, I updated my PC to Windows 10, as you do. Then the USB5M software stopped working. Not compatible.
So I have since spent hundreds buying new boards from Eletronics123.com The new boards are good, just as good as the old stuff and in some ways better. Except each button can only hold 1 sound. So instead of having several sounds on rotation for each of my 8 buttons, I only have one sound per button. Bummer.
On the upside, I also acquired a personal speaker (50W) while in the USA. Was not available here in Australia, but I got it at an electronics shop in the USA. I actually bought 3 units, even though I really only need 1. Thats the kind of thing I do, one for backup, one for backup backup…
With these speakerboxes I have replaced the long wires running up my arms from the buttons to electronics. Now, each of the two voice electronics boards is mounted at my wrists with their own battery (9V). Then Mono-aux cables run up my arms, and plug into the microphone and aux ports on the speaker box. Much neater.
The biggest problem now is making sure the speaker volume doesn’t get too high. The speaker is so powerful, I set it at about 10% volume and that is plenty. Any more and it suddenly becomes deafening to all, especially me! It is really easy to knock the volume knob too high or low, and then having to adjust it when I am in the suit is difficult. Still to be solved.
August 2017
The droid mask.
I have always wanted to have a droid mask that ‘translated’ my wookiee sounds, with eyes that flashed in time with the speech. I have finally gotten halfway with this.
Making a circuit that triggered wookiee sounds when I spoke through a mic has NOT worked. The trigger start and stop delays are too long in standard circuits I can buy off the shelf. I finally gave up on that bit in early 2017.
What I have achieved is a droid face with flashing eyes. Details to come.
Contact
This blog is for my own record more than anything, but I hope if you have read this far you have found something useful, or at least interesting.
If you really want to contact me about my build, please use the Chimera Productions email on the Contact Us page.
Leave a comment